Tuesday, October 11, 2011

Introduction to NUnit Assertions

Continuing our tutorial after the first NUnit program, lets get ourselves bit accustomed with the central command/class in the framework - "Assert"

The Assert class defines tons of static methods which we use to verify the correctness of the program under test. So our test cases essentially perform some action on the program and then assert whether the outcome is what we expect. For eg: passing two arguments 2 & 3 to an Add method should return 5. If the method returns anything other than 5 then the Assertion fails which in turn marks the test-case as failed. Simple right! Yes!

So lets write few simple test-cases to see the Assert in action.To keep things simple lets not bother ourselves to find a program to test, we will simply use assertions on variables.
So go ahead and add a new class to the solution (Right click on solution name > Add > Class) and name it SimpleAssertions.cs. Paste the below code in this class file, rebuild the solution and Run the test-cases in NUnit

using System;
using NUnit.Framework;

namespace NUnitTest1
{
    [TestFixture]
    class SimpleAssertions
    {
        [Test]
        public void Add()
        {
            int val = 5 + 5;
            Assert.AreEqual(10, val);
        }

        [Test]
        public void FindGreater()
        {
            int a = 45;
            int b = 28;
            Assert.Greater(a, b);
        }

        [Test]
        public void CheckNull()
        {
            string str = "";
            Assert.NotNull(str);
        }

        [Test]
        public void IgnoreCase()
        {
            string small = "something";
            string caps = "SOMETHING";
            StringAssert.AreEqualIgnoringCase(small, caps);
        }
    }
}

Nothing fancy going here and the code is extremely readable thanks to clear method-names in NUnit. All the test-cases will pass when you run them.


Wednesday, July 6, 2011

NUnit: Simple

Next step is to write our own script in Nunit from scratch. To do this
Create a new project ‘NUnitTests’ in VS C# and select the project type as ‘Class library
Add reference to Nunit.Framework.dll in the Project
Rename the default class file (Class1.cs) to SimpleAssertTest.cs
Copy the below code in the file and compile it.

using System;
using NUnit.Framework;

namespace NUnitTest1
{
    [TestFixture]
    public class SimpleAssertTest
    {
        [Test]
        public void TestTrue()
        {
            Assert.IsTrue(true);
        }
       
        [Test]
        public void TestFault()
        {
            Assert.IsTrue(false);
        }

        [Test]
        public void TestEqual()
        {
            Assert.AreEqual(2, 2);
        }
        [Test]
        public void TestNotEqual()
        {
            Assert.AreEqual(2, 3);
        }
   
    }
}

The code will compile and depending on your VS project setup will generate the dlls in /debug or /release folder.
Start Nunit and open a project
Browse to the NUnitTests.dll and the tests will open in the nunit workspace
Run the tests

Friday, July 1, 2011

CLR version error on starting Nunit

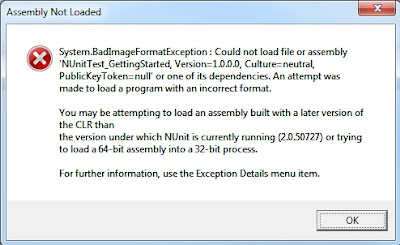
I am totally new to Nunit and creating test cases in VS for it, so I google for tutorial, follow the steps word by word try to pull the project in NUnit and am received by a lovely window


Makes me feel either I am too dumb or Nunit needs to test their own product (least they could do is have some user friendly message and direct to proper documentation)

But things are not meant to be simple in ITville so I call upon my dear friend Google to help me out again and found a solution for how to fix it here

Just copying over the solution for ease of reference:
Open the nunit-x86.exe.config file (My file is at C:\Program Files (x86)\NUnit 2.5.10\bin\net-2.0)
Under <configuration> add:
<startup> 
     <supportedRuntime version="v4.0.30319" /> 
</startup>

and under <runtime> add:
<loadFromRemoteSources enabled="true" />

NOTE: It is always a good idea to leave the original setup files untouched (just in case you screw up something). Normally I rename the original file by adding a .ORIG extension, make its copy and then do any changes that I want.

If you still happen to get the same error every time you open NUnit, then delete all the shortcuts for NUnit and create a new one from the .exe in the bin folder again.

Credits: http://stackoverflow.com/questions/930438/nunit-isnt-running-visual-studio-2010-code

NUnit: The Very First Test Project

Goal: To run the simplest C# test cases created in NUnit

Setup: Visual Studio C# 2010 Express, and NUnit 2.5.10 (If you don’t have these installed follow the installation process here)

Steps:
  1. Create the Test Project
    i)    Open Visual Studio
    ii)    Create New Project using template ‘NUnit Test Application’ and rename it if you want
    iii)   The project will be created and the solution explorer will look like this 
    iv)   If you open the file ‘TestFixture.cs’ sample test cases have already been created for you containing a test case which will Pass and another that will Fail
    v)    Go ahead and build this solution by clicking Debug > Build (hit CTRL + SHFT + B)
  2. Run the Test Project
    i)    Open Nunit and click File > Open Project
    ii)    Browse to the .dll or .exe file for the .NET project we have created in step 1 (My location: (C:\Users\QA Computer\Documents\Visual Studio 2010\Projects\NUnitTest1\NUnitTest1\NUnitTest1\bin\Release)
    iii)   The tests will open in the Test explorer at left.
    iv)   Simply click the Run button to run all tests an examine the results
If you are among the unlucky ones who run into a CLR version related error while opening project in NUnit, follow the steps here to fix it.

Getting Started with Automation

With a bit of lax time in between two releases, I am trying to automate our regression test-cases we run after each build. To keep the cost in check I am trying to get this working using Selenium, C# and NUnit. However as I try to Google the basic tutorials for doing so I always find something that assumes the reader understands how Visual Studio, .NET versions and C# work. (I have no clue about the environment setup, though if all is set I am quite positive I can churn out a windows as well as a web application in C#)

So for my own sake and for those poor souls who find themselves in similar situation as mine I am planning to develop a step by step series for automation using Selenium, Visual Studio C# 2010 Express, and NUnit. I will be putting up a series of posts as I learn to do the things myself. Each post will contain a simple goal that I will solve/reach most probably with someone’s help (which will be listed in the credits)

Goal: Setup all the required software for test automation
Steps:
  1. Selenium 2  (Selenium IDE 1.0.10)
    i)        You can follow the detailed download and install steps for Selenium IDE on the official Selenium site here(Just ignore the first download page image)
    ii)       For Selenium 2.0 we need to download the Selenium Client Driver for the language of our choice i.e. C# (The download site has two drivers for C# - C# Selenium RC 1.0.3 and C# Selenium WebDriver 2.0rc3, as I am not sure what is the difference between them I have downloaded both – Might revisit this post in future when I understand the difference)
    iii)     Once installation is complete you should be able to start the IDE from the Firefox > Tools menu (NOTE: IDE 1.0.10 is compatible with Firefox 3.6 only, so if you have already upgraded your Firefox to version 4 or 5 you will need to uninstall them and install version 3 again)
  2. Visual C# 2010 Express
    i)        Download the Visual C# 2010 Express from Microsoft’s site here and run through the simple installation setup
  3. Nunit 2.5.10
    i)        Download .msi file for NUnit from the official website here and run the setup process

Hopefully you won’t face any glitches during the installations and have all the three components up and running in no time.

Tuesday, June 28, 2011

Using firefox 3 and 4 on the same machine

Well, I am tester and need to test the page layouts in many browsers including multiple versions of the same browsers. MS doesn’t support having two versions of IE on the same machine (so dumb!) but dear Firefox does. When I googled how to have Firefox 3 and 4 installed on same machine side by side all the articles that came up referred to FF3.16 and FF4 beta. However FF4 is officially out for some time now but none of the articles talk about it. So here is how to do it.

Install Firefoxes
  1. Download FF3 & FF4 
  2. Install FF3 first. While installing change the default folder where FF is installed. I changed it to
    C:\Program Files (x86)\Mozilla Firefox\v3.6.16 
  3. After the installation is complete, rename the shortcut from ‘Firefox’ to ‘Firefox3’ 
  4. Install FF4. Again, change the default installation folder. I changed it to
    C:\Program Files (x86)\Mozilla Firefox\v4.0 
  5. Rename the shortcut to ‘Firefox4’
Now you have both the versions on the machine however they both share the profile, which means that your settings, preferences and other user items will be shared between the two versions. If that is what you want then you are all set.

Create Profiles
In case you don’t want the two versions sharing all those settings then you will have to create separate profiles for each of the version.  Follow the rest of the steps to do so:
  1. Open the profile manager:
  2. Start --> Run; enter following text in the run box and hit enter “C:\Program Files (x86)\Mozilla Firefox\v4.0\firefox.exe” -ProfileManager  (NOTE: Using the path for FF3 will open the same window)
  3. The Profile Manager will open with the single profile “default” which is shared by both versions, so go ahead and delete it.

  4. Now click ‘Create Profile’ and hit next on the first step
  5. Enter a name for the profile ‘FF3’ and click ‘Finish’
  6. Repeat step 3 & 4 to create profile ‘FF4’
  7. Close the profile manager by clicking ‘Exit’
Link profiles to versions
You have the profiles setup and the only thing remaining is to link each one of them to their respective executable. So follow these remaining steps to complete the whole process:
  1. Right click on the FF3 shortcut (created in Install Firefoxes - step 3) and click ‘Properties’
  2. Add the text “-p FF3” at the end in ‘Target’ field (so that it looks like below). Click OK
  3. Repeat steps 1 & 2 for Firefox 4 shortcut to use FF4 profile
That’s it!

Catch: You cannot run both the Firefox versions at the same time though, either FF3 or FF4 at a time. If you are using FF3 and want to switch to FF4, you will have to close all instances of FF3 and then open FF4 or vice-versa.
Let me know if there is any way you can run both at the same time.

Note: I am using Windows 7, so you will have to do any OS specific changes if you are using any other OS.

Credits:
  1. My boss Ken
  2. http://www.thewindowsclub.com/how-to-run-firefox-3-and-firefox-4-simultaneously-in-windows